Setting Up a Scan Converter
by Roger McCarten, Product Manager
Properly setting up a scan converter can make all the difference in the world in respect to image quality. A little fine-tuning can make the difference between a poor image and a good image. To obtain the best image, certain adjustments should be made each time a scan converter is used in a new application. The sequence in which the adjustments are made is also important. Making a setting out of sequence may undo the effects of an earlier setting, and make it impossible to achieve the best image.
For simplicity's sake, this article will use Extron's VSC 300's features as a general example in order to explain how to properly set up a scan converter. The general principles will be the same with other scan converters, though they may not have all the adjustments, or the range of settings the VSC 300 does.
Initial Considerations
When setting up a scan converter, it is best to use the actual software application (e.g. PowerPoint, Excel/Lotus, or Word) that will be displayed, as well as the computer that will actually be used. It is not a good idea to use a video test generator to set up a scan converter, and then use the scan converter with a computer to display a spreadsheet or other document. In such a case the settings will not be optimal for the computer application. If the scan converter is to be used as part of a video system, the screen that will actually be viewed (i.e. the "end of the line") should be referenced when setting up the scan converter. Image characteristics can change as the signal is routed over a video system. The image seen on a monitor that is connected directly to the output of the scan converter may not correspond to what is seen on a monitor after the signal has gone through the video system.
Setting Up the Scan Converter: Step By Step
Follow these steps in sequence. Again, doing the set up out of sequence will not lead to the best possible image.
Step 1- Set the output format.
Select the desired output rate by setting it to NTSC or PAL as needed.
Step 2- Size and center the image.
Ensure that the zoom adjustment and/or horizontal and vertical sizing are at the desired settings. They should be set to the point where they will stay during most of the presentation.
Step 3- Set the horizontal filtering.
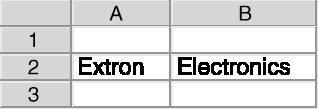
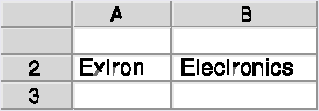
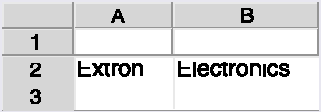
The horizontal filter adjusts how the scan converter processes pixel information on the horizontal plane. This in turn will affect vertical features. Figure 1 is a reference figure used to demonstrate how the filters will affect an image. As the horizontal filter is adjusted, the viewer will see vertical features drop out at one extreme, as in Figure 2, and will see the image become soft at the other extreme, as in Figure 3. The horizontal filter should be adjusted so that there is no pixel dropout, and so that the image is not too soft. See the following section "Horizontal Filter Operation" for an explanation of how the horizontal filter operates.
Step 4- Set the vertical filtering.
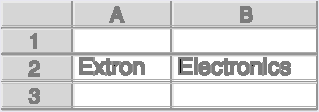
The vertical filter adjusts how the scan converter averages horizontal lines. As the vertical filter is adjusted, the viewer will see horizontal features drop out at one extreme as seen in Figure 4. As the filter is adjusted to the other extreme, the viewer will see text become stretched out vertically (or appearing as double horizontal lines). When the filter is properly adjusted, there will be no drop out, and features will not be blurred or stretched out vertically. Again, Figure 1 above shows the ideal image. See the following section "Vertical Filter Operation" for an explanation of how the vertical filter operates.
The Horizontal Filter
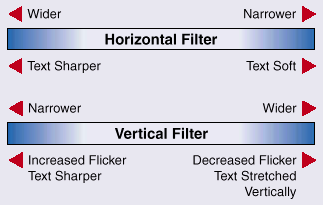
The horizontal filter adjusts how the scan converter processes pixel information across the horizontal plane. This feature is also referred to as "anti-aliasing". As the horizontal filter is adjusted from narrow to wide, the scan converter changes how it samples. When the horizontal filter is set wider, the sampling window becomes narrower. When the horizontal filter is set narrower, the sampling window becomes wider. Therefore, when the filter is set too wide (position 1 on the VSC 300), the sampling window will be too narrow. Thin vertical image features will drop out. If the filter is set too narrow (position 8), the sampling widow will widen, resulting in pixel blending. This will give text a soft or fuzzy appearance. The horizontal filter should be adjusted in accordance with the resolution being scan converted. In general, it should be set wide (position 1) when lower resolutions are scan converted and narrow (position 8) when higher resolutions are scan converted.
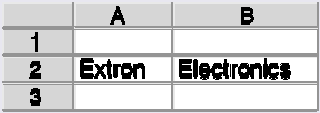
To help properly adjust the horizontal filter see Figures 2 and 3. When the VSC 300's horizontal filter has been set too narrow for the resolution, the image will look like that shown in Figure 2. Here the sampling window is too narrow, causing dropout and vertical features begin to disappear. At the other extreme, if the horizontal filter is set too wide, the sampling window becomes too wide and pixels blend together. The result is that the image appears softer. An example of this effect is shown in Figure 3. When the horizontal filter is properly adjusted, text should not look blurry and there should be no dropout. Keep in mind in that text is used for these examples. In the case of graphics, if may actually be preferable to set the filter so that the image appears soft. In other cases, the narrow filter setting may make an image look best.
The Vertical Filter
The vertical filter adjusts how the scan lines are averaged in the down conversion process. On the lower settings, more emphasis will be given to an individual line. On higher filter settings, the emphasis will be divided across several lines (line information is averaged more equally).
In adjusting the vertical filter, the user will see a trade off between flicker and image sharpness. With the vertical filter at the lowest setting, text will look sharpest, but there will be considerable flicker. Since more emphasis is given to each individual line, versus averaging several together, line information will appear then disappear as the interlaced fields switch back and forth. This causes the flicker. When the vertical filter is set at its widest point (position 9 on the VSC 300), information from more lines will be used in the scan conversation process. With more lines averaged together in the scan conversion process (from both fields), similar information will be in each of the alternating fields, so flicker won't be so evident. The other effect that will be seen as the vertical filter is adjusted is that text will appear sharp with the filter set low/narrow, and text will blur with the filter set high/wide. Again, this is the result of how much line information is combined at a time.
The vertical filter should be set low/narrow when lower resolutions are being scan converted, so that more emphasis is placed on each line. Where the vertical filter should be set will depend on the resolution the scan converter is down converting (fewer lines makes each one more important). When a high resolution source is being scan converted several lines will have to be combined to create each new line. Therefore, the vertical filter should be set high, so more equal emphases will be given to several lines at a time to assure information is not missed.
Figure 5 shows an example where the vertical filter has been set too narrow. In such a case not only is there considerable flicker, but fine lines horizontal lines may be missing as a result of the sampling process missing information on the vertical plane. Notice the missing line on the on the spreadsheet. Figure 4 shows an example where the vertical filter is set too wide. Text begins to blur together on the horizontal plane. A medium can be found where the text looks sharp, but there is not drop out. As with the horizontal filter, if anything other than text is to be displayed, such as graphics, a soft or extremely sharp vertical filter setting may actually be desired. To achieve the best possible image it may be necessary to go back and forth setting the horizontal and vertical filter settings a few times.
 Chrome
 Firefox
 Edge
Edge
 Safari